
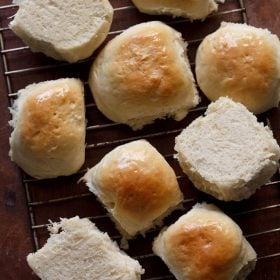
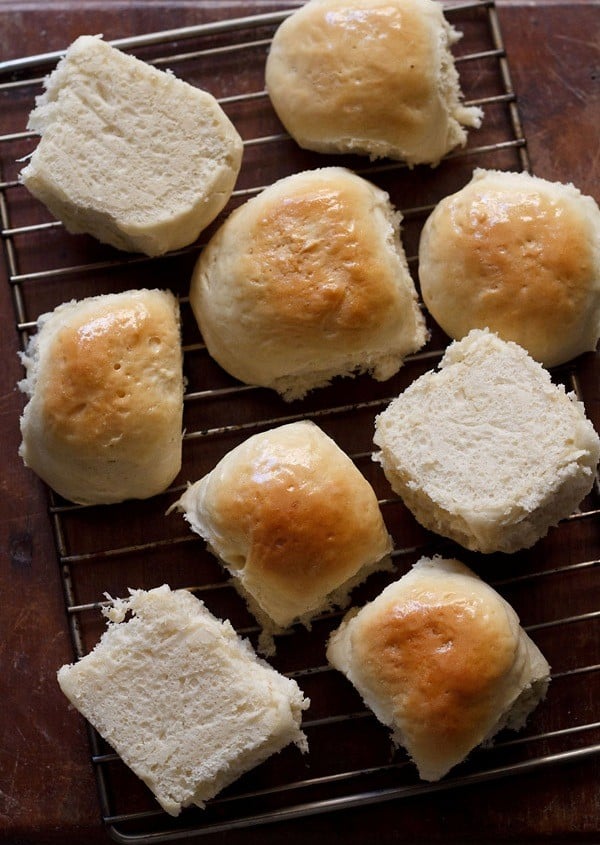
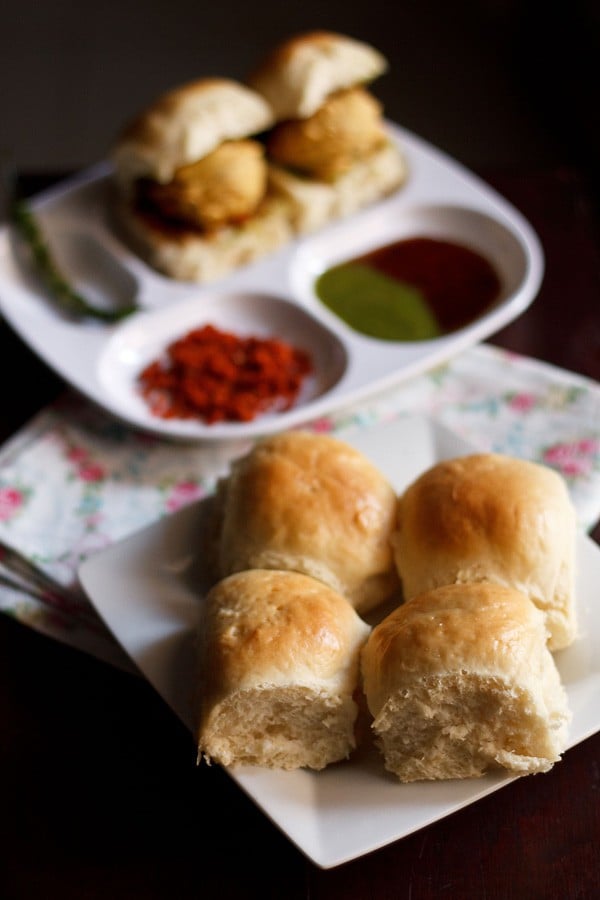
There’s a lot extra to breads in Indian delicacies, than simply the well-known flatbreads. As an example, take this Pav, which can also be in style below the sobriquet Ladi Pav and is a specialty from the ‘metropolis of desires,’ Mumbai in Maharashtra. Whereas there’s extra to examine this Mumbai type bun within the publish, I’m additionally sharing a step-by-step Pav Recipe so that you can simply observe and make this comfortable, fluffy and light-weight bread at residence. The substances aren’t a lot however the process is sort of lengthy. So, be certain that to observe the recipe properly to get the perfect end result.
Historical past of Pav
Pav is mainly a small loaf of bread, launched by the Portuguese in India. Thus, additionally known as ‘pao,’ going by the Portuguese meals traditions. However it doesn’t actually cease right here. There are lots of tales which can be related to the historical past and delivery of what’s well-known because the Mumbai Ladi Pav right this moment.
Talking of the Portuguese connection, it’s stated that they missed relishing on crusty bread (additionally part of their Holy Communion) whereas they had been in Goa and Cochin. Since there was no yeast that point, they fermented their all-purpose flour bread doughs with toddy and baked them on scorching surfaces.
After a variety of hits and misses, they lastly got here up with their model of the Pao or Pav Recipe. This was additionally the time when the Pav turned a standard meals not only for the Catholics, but additionally for Muslims. Alternatively, Hindus had their fair proportion of conventional flatbreads, basically made with out all-purpose flour.
In response to some meals historians, round 1960, migrant employees introduced this particular bread motion to town of Bombay (current day Mumbai). That they had particular expertise of baking the Ladi Pav breads, which ultimately turned a signature must-have on the street meals of Mumbai.
Some specialists additionally declare that the phrase Pav refers to ‘quarter or ¼ᵗʰ .’ The truth that you get the Ladi Pav in a set of 4, from which every mini bun is damaged off after which consumed, is a proof to this. It is usually stated that because the bakers kneaded the dough with their ft at the moment, the title is Pav.
About Pav Recipe
Commercially, Pav is all the time made with maida or all-purpose flour. Nonetheless, at residence, we will make these small bread rolls with complete wheat flour (atta) or different flours. I additionally make a Pav Recipe with 100% complete wheat flour.
You could possibly decide to make Pav with equal parts of each all-purpose flour and complete wheat flour. Pav made this manner utilizing an equal mixture of each the flours additionally yields a comfortable and light-weight texture.
The recipe of Mumbai Ladi Pav on this publish is made with 100% all-purpose flour (maida). I make these gentle bread rolls infrequently or on demand, when the common Whole Wheat Bread or chapatis get monotonous for the household.
I’ve developed this Pav Recipe over a time frame to get the perfect end result. The recipe methodology makes use of the sponge or ‘poolish’ methodology for leavening, leading to tremendous comfortable and spongy Pav.
I’ve added prompt yeast within the recipe. Nonetheless, recent yeast or dry energetic yeast can be used. To get the aroma and style like that of the Ladi Pav made within the bakeries, it’s advisable to make use of recent yeast. The proportions of all 3 are talked about within the recipe card beneath.
Often, I make these Mumbai type buns or dinner rolls to be served with Pav Bhaji, Misal Pav, Masala Pav, Vada Pav, samosa pav or pav sandwich. I by no means purchase Pav from outdoors as this recipe actually yields in glorious home made bread rolls.
Step-by-Step Information
Methods to make Pav
Make Dough
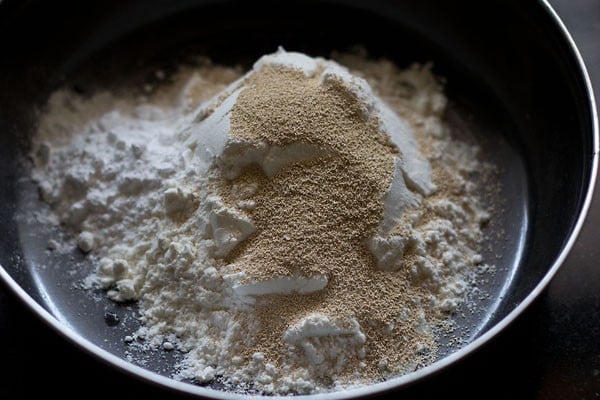
1. In a bowl take, 1 cup all-purpose flour, 1 teaspoon prompt yeast (speedy rise yeast) and a pair of teaspoons sugar.
Be sure the water is lukewarm. If not then all of your efforts will go waste. The water shouldn’t be scorching.
Notice: If utilizing energetic dry yeast or recent yeast, then make sure the water is neither scorching nor cool. Sizzling water will destroy the yeast and chillier water or cool water gained’t assist in activating the yeast.
2. Add 1 cup lukewarm water.
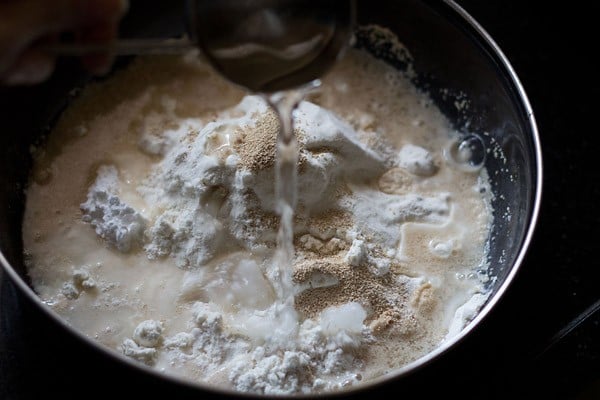
3. Stir or whisk to make a easy and thick batter with none lumps.
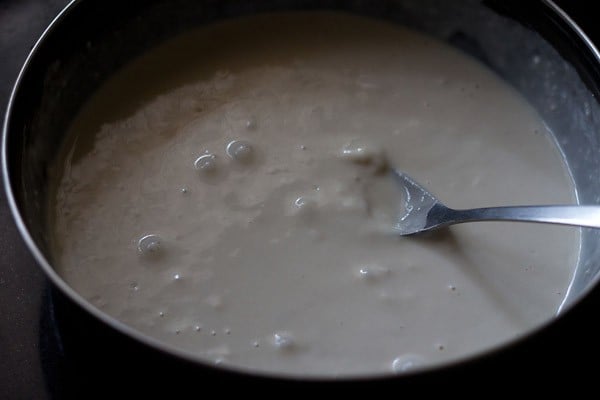
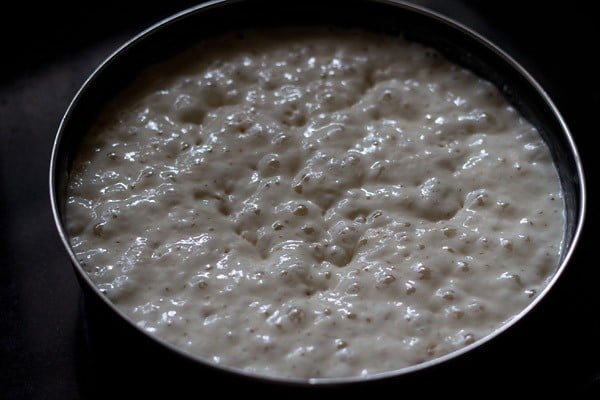
4. Cowl and hold the bowl for 30 to 40 minutes or until you see a bubbly and frothy combination. The batter would even have risen.
The image beneath exhibits the consistency. That is the sponge starter.
5. Add 2 tablespoons oil, 1 teaspoon salt and 1 cup all-purpose flour.
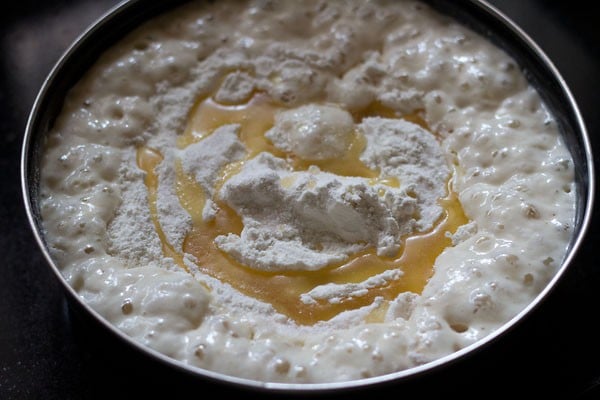
6. Combine with a spoon or spatula.
7. Add 1.25 cups of all-purpose flour.
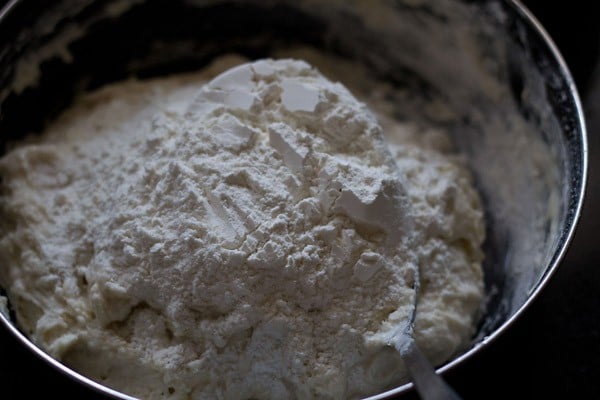
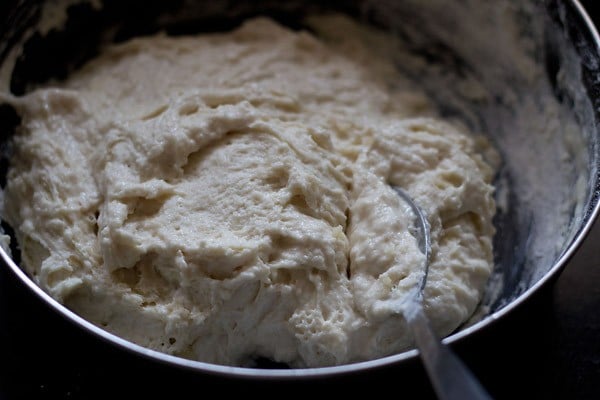
8. Combine after which start to knead for about 10 to 12 minutes. If the dough seems sticky, then you’ll be able to add about ¼ to ½ cup flour.
The proportion of water to be added relies on the standard of the flour. General, I added 3.25 cups flour and 1 cup water.
You can even knead the dough utilizing a stand-mixer bowl connected to a dough hook.
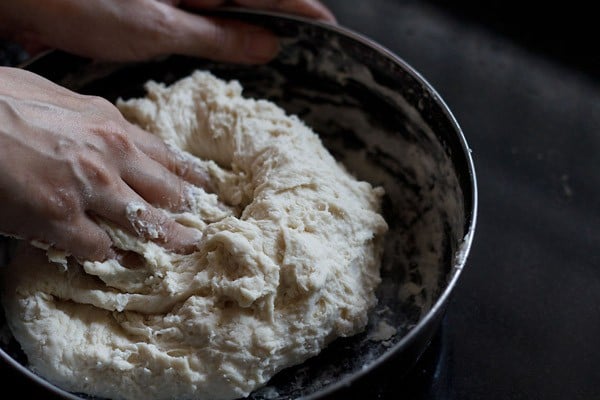
9. Knead to a easy, pliable, comfortable and elastic dough. The dough on stretching shouldn’t break or tear.
Leaven Dough
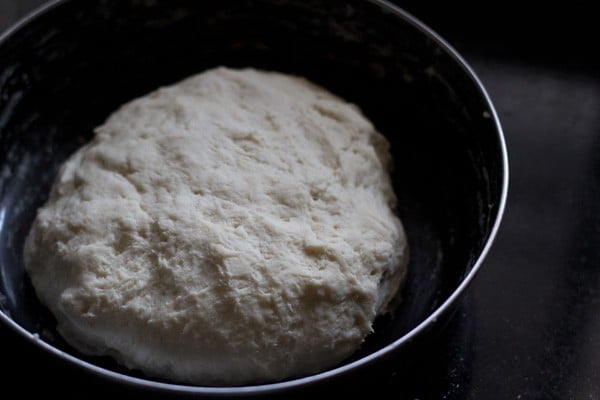
10. Unfold oil or butter everywhere in the dough. Cowl the bowl with a kitchen cotton serviette or a lid and hold the bread to leaven for 20 to 25 minutes.
The leavening time relies on the kind of yeast used and the temperature circumstances.
- For immediate yeast, 20 to 25 minutes of the primary rise is sufficient.
- For dry energetic yeast or recent yeast, you’ll have to hold for about 45 minutes to 1 hour or extra.
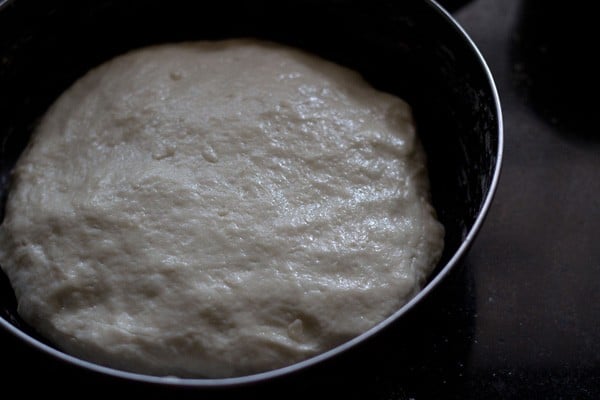
11. The risen and doubled dough for Pav.
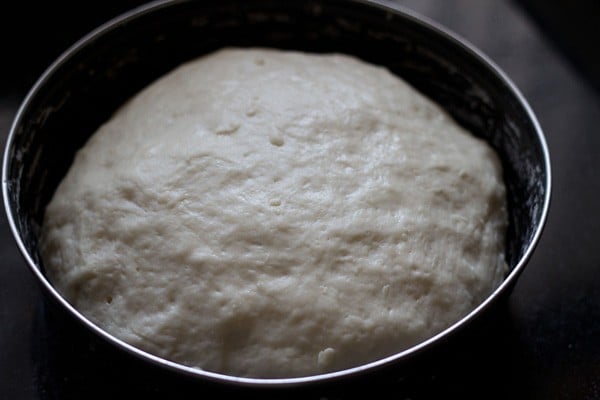
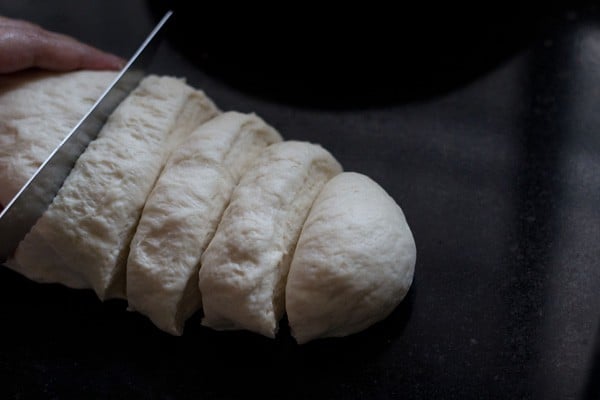
12. Gently punch and deflate the dough and type a log.
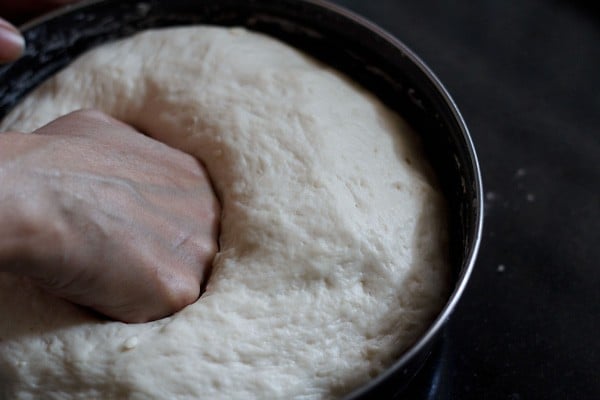
13. Slice the log into equal parts.
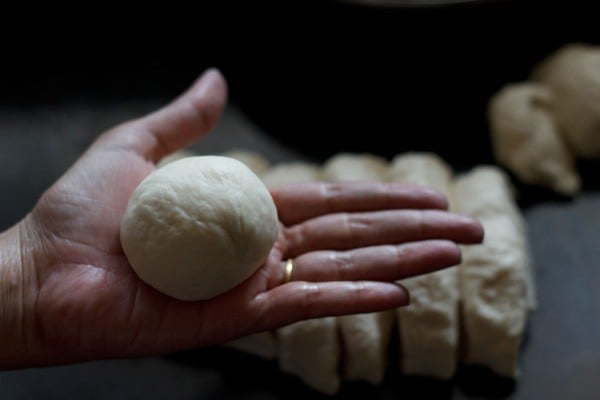
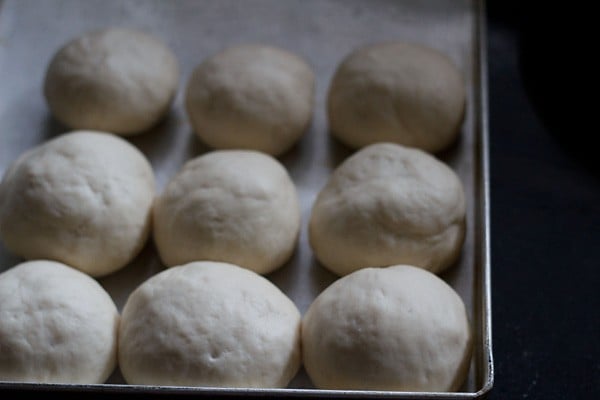
14. Take every portion and roll between your palms to get a easy spherical roll.
Bake Pav
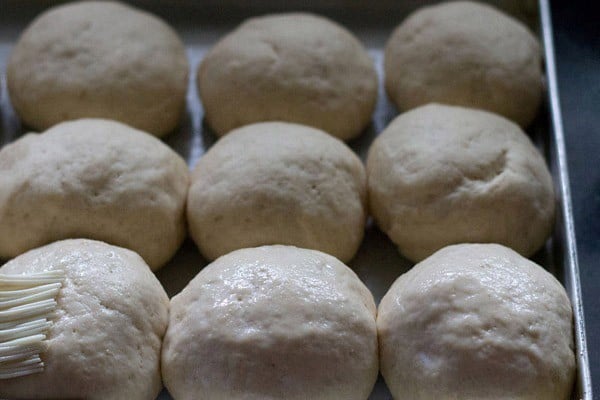
15. Make rolls this manner and place them in a greased baking tray preserving 1 inch area between every. Cowl and hold for 25 to half-hour for the second rise. The small buns would improve in measurement.
16. Then, brush the rolls with some milk. This offers a golden coloration to the Ladi Pav.
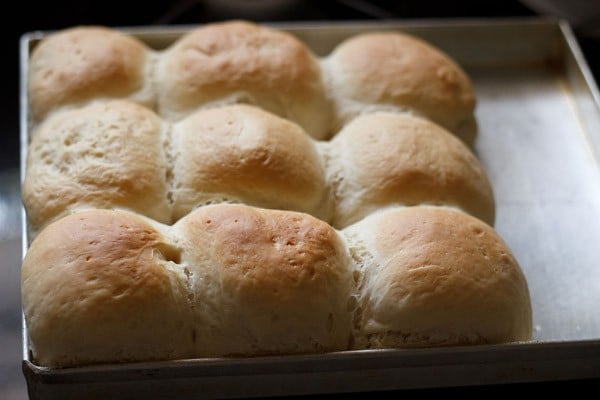
17. Place the baking tray in a preheated oven at 200° C/ 390° F for 25 to half-hour or until the tops flip golden and the rolls sound hole on tapping.
Earlier than baking, keep in mind to preheat oven at for 200° C/ 390° F quarter-hour.
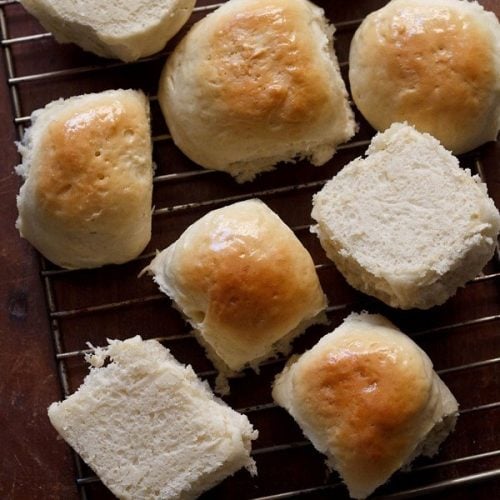
18. Take away the baked rolls from the tray (with a spatula) and place on a wired rack or wired tray, in order that they don’t turn out to be softened and moist from the underside on account of warmth condensation.
Brush melted butter or unfold softened butter on high of the Pav for a glaze. That is an non-obligatory step.
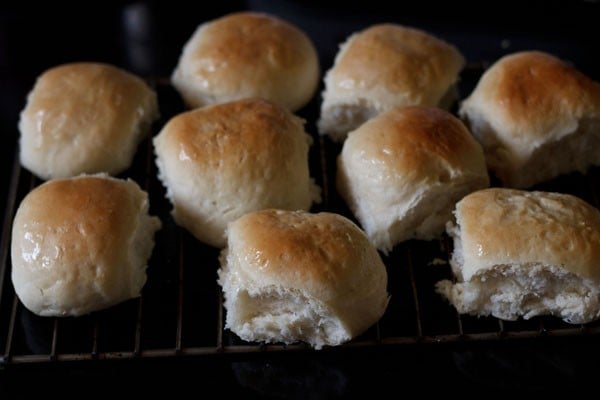
19. Serve Pav heat or at room temperature with any curry like Usal, a vegetable dish or simply as plain Maska Pav (buttered rolls) with Masala Chai or Cutting Chai.
You can even use them to make Mumbai avenue meals snacks like pav bhaji, misal pav, vada pav or Kacchi Dabeli.
Leftover Pav retains properly for a couple of week within the fridge and some weeks within the freezer.
Knowledgeable Suggestions
- When you can supply, then strive making pav with unbleached all-purpose flour. You can even make these fluffy dinner rolls with bread flour.
- The amount of water to be added relies on the standard of flour. If the dough turn out to be sticky, then add some flour and if the dough appears dry, then add some water.
- As an alternative of kneading with palms, you may as well knead the dough in a meals processor or in an electrical mixer with a dough hook.
- If the highest floor of the buns browns shortly, then place aluminium foil or parchment paper on the highest. This may keep away from additional browning.
- The leavening time relies on the kind of yeast used and the temperature circumstances. For immediate and recent yeast, hold for 20 to 25 minutes for the primary rise. For dry energetic yeast, you’ll have to hold for about 45 minutes to 1 hour or extra.
- Brushing the pav bread rolls with some milk provides a pleasant golden coloration to them on baking. You’ll be able to brush the baked buns with melted butter too for a glaze.
- As soon as the Ladi Pav bread is baked, take away them from the tray and place on a wired rack in order that they don’t soften or moisten from the underside on account of warmth condensation.
Extra Bread Recipes To Strive!
Bread Recipes
Bread Recipes

Bread Recipes
Vegan Recipes
Please be sure you fee the recipe within the recipe card or depart a remark beneath in case you have made it. For extra veetarian inspirations, Sign Up for my emails or observe me on Instagram, Youtube, Facebook, Pinterest or Twitter.
Pav Recipe | Ladi Pav | Pav Bread
Pav or Pao are comfortable, fluffy and light-weight dinner rolls in style within the metropolis of Mumbai (beforehand Bombay) Additionally known as Ladi Pav or Pav Bread these comfortable buns are made with all-purpose flour, yeast, sugar, salt, oil and water.
Prep Time 1 hr 30 minutes
Prepare dinner Time 25 minutes
Complete Time 1 hr 55 minutes
Stop your display from going darkish whereas making the recipe
Making dough
In a bowl take 1 cup of all-purpose flour, prompt yeast and sugar.
Add 1 cup lukewarm water. Stir or whisk to make a easy thick batter with none lumps.
Cowl and hold the bowl for 30 to 40 minutes until you see a bubbly and frothy layer on the highest. The batter would even have risen.
Add oil, salt and 1 cup flour. Combine with a spoon or spatula.
Subsequent add 1.25 cup flour. Combine once more after which start to knead for about 10 to 12 minutes.
- If the dough seems sticky then you’ll be able to about ¼ cup flour extra or as wanted. The proportion of water to be added, relies on the standard of the flour. I added 3.25 cups flour for 1 cup of lukewarm water.
Knead very properly to a easy, comfortable, supple and elastic dough.
Place dough in a bowl. Unfold oil or softened butter everywhere in the dough.
Leavening pav dough
Cowl the bowl with a lid or a kitchen cotton serviette and hold the bread to leaven for 20 to 25 minutes.
As soon as the pav dough has risen and doubled, then gently punch and deflate the dough and type a neat log.
Reduce the log into equal sizes. Take every portion and roll between your palms to get a easy spherical roll.
Make rolls this manner and place them in a greased tray preserving 1 inch area between all of them.
Cowl and permit the second rise for 25 to half-hour. The small buns would improve in measurement.
Baking ladi pav
- Simply earlier than quarter-hour you bake the pav, preheat the oven at 200° C/ 390° F.For a daily oven, warmth each the highest and backside parts. For a microwave oven with convection mode, preheat for quarter-hour at 180° C/356° F.
Then brush the pav buns with some milk. This offers a golden coloration to laadi pav.
- Place the baking tray within the middle rack in a preheated oven at 200° C/ 390° F for 25 to 30 minutes or until the tops flip golden and the pavs sound hole on tapping. For baking within the microwave oven at convection mode, bake at 180° C/356° F.
Take away them from the tray (with a spatula) and place on a wired rack or wired tray, in order that they do not turn out to be softened and moist from the underside on account of warmth condensation.
Brush melted butter or unfold softened butter on high of the pavs. That is an non-obligatory step.
Serve the Pav heat or at room temperature with any curry, vegetable dish or simply as plain bun maska pav (buttered rolls) served with masala chai.
Pav could be saved within the fridge for a couple of week. Hold them in air-tight a container or a bread field.
- If the dough turn out to be sticky then add some flour and if the dough appears dry, then add some water.
- If the highest floor of the bread browns shortly than place aluminum foil or parchement paper on the highest. This may keep away from additional browning.
- As an alternative of kneading with palms, you may as well knead the dough in a meals processor or in an stand mixer with a dough hook.
- The leavening time relies on the kind of yeast used. For immediate and recent yeast, 20 to 25 minutes of the primary rise is sufficient. For dry energetic yeast, you’ll have to hold for about 45 minutes to 1 hour or extra.
- If doable use unbleached all-purpose flour. You can even make pav with bread flour.
- Pav recipe could be simply halved, doubled or tripled.
Diet Information
Pav Recipe | Ladi Pav | Pav Bread
Quantity Per Serving
Energy 238 Energy from Fats 54
% Day by day Worth*
Fats 6g9%
Saturated Fats 1g6%
Trans Fats 0.1g
Polyunsaturated Fats 0.4g
Monounsaturated Fats 3g
Ldl cholesterol 4mg1%
Sodium 306mg13%
Potassium 72mg2%
Carbohydrates 40g13%
Fiber 2g8%
Sugar 1g1%
Protein 6g12%
Vitamin A 47IU1%
Vitamin B1 (Thiamine) 1mg67%
Vitamin B2 (Riboflavin) 0.3mg18%
Vitamin B3 (Niacin) 4mg20%
Vitamin B6 0.05mg3%
Vitamin B12 0.01µg0%
Vitamin C 0.01mg0%
Vitamin D 0.02µg0%
Vitamin E 2mg13%
Vitamin Okay 0.5µg0%
Calcium 12mg1%
Vitamin B9 (Folate) 128µg32%
Iron 2mg11%
Magnesium 13mg3%
Phosphorus 67mg7%
Zinc 0.5mg3%
* % Day by day Values are based mostly on a 2000 calorie food plan.
This Pav Recipe from the archives first revealed in October 2014 has been up to date and republished on January 2023.
Source link


: The Chef-Crafted Meal Delivery Service")

